Clocked in at around 62 hours. That should be pretty average for someone that did a million pit stops (re: sidequests) along the way, right? Or maybe average for someone that did pit stops and kept getting lost in some areas. :3
5-starred all final boss fights! Too bad that doesn’t net me any special trophies or fragments! Also, I was at level 99 for everything already so taking them out didn’t require too much effort. XD
Funny how those fights were infinitely easier than the Proto-behemoth. I’ve yet to manage to kill that thing. Those stupid floating kitty enemies really don’t help matters either. I guess I need a beefier Sentinel monster to survive it or at least figure out some paradigms that’ll work well against it.
Edit (Feb 18): It seems like the Proto-behemoth and Schrodingers (stupid floating kitty enemies) don’t reappear again after completing the dungeon??? This didn’t happen before I cleared the Paradox Ending though. Weird. 😦 I want another Schrodinger because of its Auto-Haste ability that you can fuse with other monsters. .___. Maybe I should hunt down other creatures that have the ability. The problem is, I have no idea which ones have it. (Well, as one that can be learned through the Crystarium.)
Oh, fail. I think they appear with Mimi and friends too.
Ah, seems like the Sahagin Prince and Cactuaroni have it. I’ve yet to catch either, I think. Guess I’ll check it out. Hopefully, I can actually give their abilities to other monsters. >_>
Incidentally, I find it somewhat interesting the “complete guidebook” doesn’t list all the abilities a tamed monster can obtain through levelling. The Battle Ultimania for the game has it but I’m not about to import that just for the information considering I’m finished and don’t plan on spending oodles of time raising monsters.
I’m off to try for some Paradox Endings just for the heck of things. Currently doing Academia 4XX AF. Hoping it doesn’t involve some crazy boss battle. The guidebook doesn’t mention anything like that so … *goes around beaning people with Mog*
Anyway, the ending is quite WTF! (Somewhat vague spoilers ahead!)
Note: each screenshot can be enlarged if you click on it
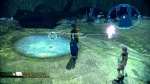
One possible Captain Crypic location in Grand Avenue (Academia 4XX AF)
I keep thinking that I should move on in the game but I always get sidetracked. Right now, I’m hunting for Cryptic. I don’t know what bright mind at Square Enix thought it’d be a fun idea to do this stupid hide-and-seek shit. Having to look for the bastard is more frustrating than the Brain Blast terminals that throw idiotic & completely random “Odds or evens?”-type questions that are obviously there just to screw you over and break your streak.
Anyway, here — suffer with me!
Captain Crypic Locations in Academia 4XX AF (Photographed from Final Fantasy XIII-2: The Complete Official Guide Collector's Edition)
While you can certainly run around madly in New Town and Grand Avenue to look for him, the citizens will actually give hints to his general location eventually. I don’t think the ones with the speech balloons will ever tell you so just hang around places where there’s people and some random NPC will speak up at some point. (What’s with the lady that says she should settle for a sugar daddy instead!?) I’m not sure how long it takes before this happens but it generally doesn’t take more than 5 minutes or anything.
Captain Cryptic locations (Academia 4XX AF) - NPCs give you hints. In this case, I have to head to New Town
Logically, if you find him in one area, search out the rest of the vicinity first before moving to the other side of the city. Of course, if you receive a tip, then go by that information.
I’m only on my second encounter right now (excluding the initial one that begins the sidequest) so once I’m done this, I have 2 more to go. And honestly, it’s two too many. 😛
Edit: Oh hey. That was quick! Found him again! Time for the Colonel rank questions. :3
Edit #2: All in all, it took me less than 20 minutes to find and answer all his questions. 😀 Probably would be faster if I didn’t keep pausing the game to edit screenshots and update this though. XD
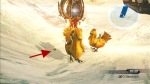
Speaking about screenshots, some random kid fell by Noel and went through his leg. (Uh, yeah. My vidcap adapter and DScaler make a good team. Scanlines and ghosting for all!) Gotta love clipping. :E I haven’t paid much attention but are these children running around or do they just happen to trip and fall while simply walking? I mean, there sure are a lot of them falling around!
“I tripped on air!”
Edit #3: Those Brain Blast terminals are definitely more annoying. Fucking luck questions. I got one at question 8 and I got it wrong. 9_9
Edit on Feb 18th: Since people seem to have trouble finding the bosses, I did this:
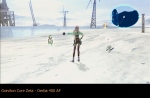
Locations of The Archylte Steppe bosses
Well, I managed to take down 3 out of the 4. Immortal was kind and dropped Romulus & Remus twice. Took a third battle before it gave me Indrajit.
I still need to redo the Ochu and Long Gui battles for their drops. I managed to get Gandiva from one fight against Ochu but I want the other weapon too. 😛
And so, only Yomi remains. I tried this battle three times and ended up hitting Retry every single time since it was getting to the point that the enemy was dealing way too much damage.
My mistake was that I didn’t have ANY Sentinel and spent most of my time buffing and healing. For some reason, it didn’t click that it had a tendency to pick on single targets and not attack the entire group (with the exception of the dreadful Wicked Whirl attack).
Someone on Twitter suggested to have at least two SABs for the fight. A friend on Facebook suggested that SABs were the way to go too so I guess I need to outfit some paradigms with Saboteurs. :3
Actually, had I had the guidebook next to me when I was playing, I would have known to shuffle out the Flanitor and throw in something like a Bunkerbeast instead.
Here’s the set-up the friend had for the fight and given the fact that he farmed Yomi, I would take it this works well:
sab com sab
sab sab sab
com com sab
med med syn
med syn syn
sen sen sen
(Serah Noel Monster)
I also changed up the accessories a bit and put some some magic resistance stuff on both Noel and Serah. Since I had one Bloodguard, I threw that on Noel. I might switch it to Serah though since Noel’s HP is really high at the moment. ^^;
Update: YAY! Yomi is done! 😀 It was a terrible battle. 😦 It took me 15 minutes and 13 secs and a stupid paradigm shift almost cost me the battle since everyone’s HP was in the red. (Was trying to go into Tortoise when it was about to do the Wicked Whirl but ended up at some other paradigm instead. 9__9) I think the poison did the monster in though since it had piddly life left anyway. XD
Since I have no need for its drop, I’m happy to say good riddance to this boss. 😛
Edit on Feb 16: My paradigms didn’t include a SAB monster, BTW. Pretty sure I had a Flanitor (MED) in place of one. The reason for this was that I didn’t have any saboteur monsters levelled and was way too lazy to begin to raise one. 😛 However, maybe if I did, the fight wouldn’t have taken so long cuz I would have an extra offensive unit instead of simply relying on Noel and Serah to do the job.
Yomi defeated! 😀
Now to spend money at Serendipity to buy the 2 remaining fragments at the exchange counter and I guess I’ll continue on with the game now!
Oh wait. I want Grasitha from Ochu, didn’t I? Sigh. Back to the Steppe then …
Update #2: Buh. Five tries later, I suddenly remembered that I had a Blue Chocobo with Item Collector. I swapped it in as my RAV monster even though its HP was wimpy. (It’s not even over 1900. >:/) All I needed to do was end the battle with it anyway so as long as I didn’t change to Relentless Assault while being swarmed by Microchus, this was going to work! :3
And it did! ^__^ (Or maybe it worked because I didn’t throw Mog at Ochu first before starting the battle this time around?)
Got both Gandiva & Grasitha in one go! XD
The silly thing is, I have Odinblade and Odinbolt already so I have no real need for these weapons. Well, other than for the Lv. 5 Chain Bonus.
Hmm. Since I spent all this time to get Grasitha, I might as well use it for a while. :3
Update #3 (Feb 16): Did a rematch with Yomi for the hell of things with the paradigms listed above. It cut down the battle time quite a bit! *_* Probably would have been a bit faster if I switched COM COM SAB in more often though.
Here’s the result:
Result from a re-match with Yomi
Er, the amount of gil you see in the screenshot is a result of having a Durable Collector Catalog equipped on Noel. ^^ It kind of stinks that it dropped a damn Tear of Woe though as a spoil. 9__9
I wonder if anyone is crazy enough to play this battle on high speed? Oh, I guess there ARE people that do it. ^^;;;;
Huh. Apparently, Raspatil is the best for gil farming. :O (Oh yeah~! Scarletite drops!!)
Gonna try switching in a Tonberry for COM since it has the Chaser-type attacks which deal more damage to enemies inflicted with certain debuffs. Wanna try and bring down the time. XD
Oh wow. Durable Hermes Sandals has Auto-Haste which casts Haste at the start of battles! But its accessory cost is 75. It also requires a Trapezohedron. 9__9
Ooh. Took down Immortal in under 2 minutes. Probably would have been faster if I didn’t stop to heal the Tonberry … or fight the stupid sword.
Whew! I already pumped in over 50 hours into the game. Unlike players that ignore sidequests just to complete the story, I’m running around doing as many of them as I can. The reason for this is that I typically lose motivation to continue playing once I’m done with a game’s main plot.
Within these 50+ hours, I’ve managed to rack up 130 fragments. If I care to find Captain Cryptic, I’ll have a few more under my belt before the final showdown. I’m not sure I have to patience to run around Academia to search out the bastard though. Completing the Academia map will also net me another fragment too. And I can probably get 4 more from The Archlyte Steppe as well if I wanted to fight the tough boss monsters. :3
I suppose it wouldn’t hurt to test my party against them seeing that every role is over 70 now. I managed to max out Commando and Ravager for Noel too.
About the story and the villain’s motive — what the hell? It’s such a lame reason. I think I prefer FFXIII’s story a bit more over its sequel. Also, I’m not quite sure how Noel’s dream qualifies as a happy dream for him cuz it’s pretty depressing overall. 😛
Anyway, here are some random screenshots to round out this entry. XD When viewing an image, click on the Permalink icon to see a description of it.
Why in all hell is there no proper guide for the destinations of the crystal (a.k.a. blue) gates? I mean, if you’re thoroughly exploring every map, you’ll most likely find all the locations but no one ever compiles the information of where each gate LEADS to. Or maybe it’s out there somewhere in the form of a message board post? Regardless of whether or not it’s readily available in some corner of the Internet, I threw together the list myself with the help of Split Infinity’s walkthough. (All I did was do a search for “crystal gate”. XD)
Note that all these kinds of gates require a Wild Artefact to unlock them. Check this video for their locations. If you look at the video description, you will find anchor links to jump to specific points in the video for each artefact. (No, the video is not mine.)
As there are 10 Wild Artefacts (one of which must be “purchased”), there are exactly 10 Crystal Gates. I’m listing the places in alphabetical order based on the locations where you find the gates.
For the screenshots, click on the thumbnail for larger images. 😀
Academia 400 AF Crystal Gate Destination: Yaschas Massif 100 AF
Isn’t this place a joy to go hunting for treasures and gates? To relieve you of the frustrations of running around in search of it, here’s a handy screenshot of the gate’s location in New Town.
Academia 4XX AF Crystal Gate Destination: Vile Peaks 010 AF
This gate is in a rather busy part of Grand Avenue (re: where all the shops are.) It’s actually quite easy to locate since Chocolina is right across from it.
Academia 4XX AF - Crystal Gate to Vile Peaks 010 AF
Archylte Steppe ??? AF Crystal Gate Destination: Vile Peaks 200 AF
The access this gate, you’ll have to defeat three Gigantuars first. While you won’t have to face all three at the same time, you’ll still want a party with an ample amount of HP since its 1,000 Needles attack can decimate your group quickly if you’re not careful. It’s definitely recommended that you have some paradigms that involve a Medic and a Sentinel.
The statutes are not immediately visible and require Moogle Hunt to reveal them. On top of this, you also need to change the weather for two of them. The one located among the cacti southwest of the Nomad Camp will show up in any weather condition. The remaining two — only available in either sunny or rainy weather — are in the Clearwater Marshes which can easily be accessed by touching the yellow cactuar statue during windy weather. Like the green cactuar statues, the yellow one needs Moogle Hunt to make it visible. Incidentally, this statue to the west of the crystal gate and is hidden in a whirlwind. (Note: All statues will not return to their invisible state after examining them regardless of weather conditions.)
The Archylte Steppe ??? AF - Crystal Gate to Vile Peaks 200 AF
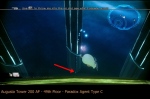
Augusta Tower 200 AF Crystal Gate Destination: Oerba 300 AF
The gate is hard to miss but what prevents you from getting to the floor it’s on (which is the 49th Floor) is the fact that during the initial visit here, the elevator will only take you to the upwards as dictated by the story. However, once you finish your business on the top floor, you can go back to the elevator and head to any floor at your own leisure.
Augusta Tower 200 AF - Crystal Gate to Oerba 300 AF
Bresha Ruins 005 AF Crystal Gate Destination: Bresha Ruins 300 AF
The gate is located in the southwestern tunnel, just west of the holding cell. You will need to retrieve the Holding Cell Key to open the cell door. The key is in a treasure sphere floating in the circular area just north of the shiny/story gate to the south. While you can hop onto the pillars while riding on the back of a chocobo for some reason, you can’t physically get to the sphere; you have to hurl Mog at it instead.
Bresha Ruins 005 AF - Crystal Gate to Bresha Ruins 300 AF
Bresha Ruins 300 AF Crystal Gate Destination: Yaschas Massif 110 AF
Find this gate northwest of the graveyard (Lamentable Rest) which was an area previously inaccessible in Bresha Ruins 005 AF.
Bresha Ruins 300 AF - Crystal Gate to Yaschas Massif 110 AF
A Dying World 700 AF Crystal Gate Destination: Bresha Ruins 100 AF
It’s in the southwest Black Sands area. You’ll only have access to this section and the Abyssal Fissure to the north when you re-visit A Dying World from the Historia Crux. The earliest you can do this is when you return to the timeline after New Bodhum 700 AF.
A Dying World 700 AF - Crystal Gate to Bresha Ruins 100 AF
Oerba 300 AF Crystal Gate Destination: Oerba 400 AF
Ah, the joys of the Oerba eras. They are ALL infested with anomalies. Unfortunately, this means that you will have to go through some Temporal Rifts to even get the option to use a Wild Artefact on the gate.
The guidebook notes that you will need to solve the Rifts that give you the following fragments: Sparkling Runestone, Thrilling Milestone, Dewy Bloodstone, Spinning Moonstone, and Astonishing Limestone. Thankfully, only one of the five will put you up against the Hands of Time. Once you get these, you’ll get yet another Rift which will happily manifest itself right in front of the crystal gate. And what do you know? It just so happens that this anomaly contains a clock puzzle! How splendid!
Yaschas Massif 100 AF Crystal Gate Destination: Sunleth Waterscape 400 AF
You should be thankful that the Waterscape 400 AF isn’t a mandatory location as this crystal gate can be rather annoying to unlock. To activate it, you have to complete most of the fragment sidequests in this era … which means solving several Temporal Rifts that consist of the ever-so-aggravating Hands of Time puzzles.
If you’re out to get the Graviton Cores and want to steer clear of these things, just get Alpha to Epsilon as you only need 5 of them to continue with the story. Eta and Zeta both require some degree of traversing through Temporal Rifts to obtain. Of course, if you’re gunning for all 160 fragments then you will have no choice but to endure the pain.
Yaschas Massif 100 AF - Crystal Gate to Sunleth Waterscape 400 AF
Got the book today. It’s very nice but I really wonder why the maps couldn’t include labels of where each crystal/blue gate leads to. 9__9 I haven’t really gone through the book thoroughly so I dunno if there’s some flowchart or any equally handy chart that’ll list where all the gates are and their destinations.
Hmmm … I’m thinking I should make a list of everything I want to achieve before the end of the game such as monsters, items, equipment, and fragments cuz there sure is a lot. @_@; Yeah, I do realize that I can continue after completing the main story but I pretty much lose motivation at that point so I might as well get as much as I can now!
I’m definitely not aiming for all 160 Fragments because I detest things that require luck to obtain like the Lucky Coin one which requires you to get 7,777 coins from the slot machine. I have better things to do than sit at a bloody machine and hope that it’ll give me jackpots. I also don’t think I’ll be going for the Paradox Endings. I might though … if I’m feeling masochistic enough one day.
On the subject of slot machines, apparently, auto-playing them is a very bad thing to do even when the machine “is on fire” or “like a hot summer’s day”. According to the guide, the chances of winning are reduced if you just sit there and hold onto the L1 button (PS3 version). 😦 The Eternal Crystal which, I believe, can only be obtained if you have a save file of FFXIII on your console’s hard drive, is supposed to better the odds. Dunno how much help it is but since I’ve been doing the L1 thing, I suppose I wouldn’t notice any difference. 😛
Where are the three fallen stars in Yaschas Massif 01X AF?
The “three fallen stars” for the Mirror of Atropos fragment/quest in Yaschas Massif 01X AF are actually crystals. Ivory and Onyx Crystals are fairly easy to come across. Mog Hunt is needed for the Onyx one. The Emerald Crystal requires the Mog Throw ability which isn’t available until Sunleth Waterscape 300 AF. See screenshot here for the Emerald’s location. .
Edit on Feb 17th: Since there’s a bunch of search terms that lead to this entry, I figure I should just show the locations so here, I’ve done a crappy scan of the map from the guidebook. The locations of all “stars” are indicated by the blue and white squares numbered 3 to 5. .
How to get the sixth/6th fragment in Yaschas Massif 110 AF?
You can’t get this until you obtain a sidequest from Bresha Ruins 100 AF. Then you have to go to Yaschas Massif 100 AF to get a key item called Thorne’s Information from Uma. She can be found in the area where you met Hope and Alyssa in Yaschas Massif 010 AF. Finally, return to YM 110 AF and use Mog to reveal the wandering spectre in the dead end of the east side of the map (Pass of Paddra). Answer his question and you should receive the fragment. .
How to solve Temporal Rift puzzles (especially the clock puzzles/Hands of Time)?
The only Temporal Rift puzzles that aren’t randomized in the games are the Tile Trials and Crystal Bonds. There are video walkthroughs for these on YouTube by various players. However, you are essentially on your own for any clock puzzles because someone or some people at Square Enix were sadists. Hell, it’s probably payback for all the flak gamers gave them for FFXIII. 😛 Seriously though, these things are randomly generated so the chances of you getting the same puzzle as someone else is unlikely. .
How to get 100% completion for the Bresha Ruins map?
Completing it is only possible once you gain access to its 100 AF era. Basically, you need to travel to the Ruins in 3 different eras in order to get 100%. The grassy area right of the stairs on the east side of the map can be reached in 005 AF while riding on the back of a chocobo. Just get onto the slab of rubble that’s on the stairs and leap into it. . In fact, if you’re finding that you can’t get 100% on maps and still have some locked areas in the Historia Crux, there’s a good possibility that one or two of those locked ones are a location you need to go to get to places you can’t in the current map. However, the exception to this is The Archylte Steppe. There’s a good chance you’re just missing this little stump of land. In the image, I state that you need a chocobo. I’m not 100% sure about it but the gap does kind of seem too large for the Anti-Grav Jump to work. I’ll try to make the jump without the bird and update this part with my findings. .
Edit on Feb 12: Looks like attempting to jump to the pillar with the Anti-Grav Jump falls just short so I would still recommend a chocobo.
Oh, and those waystones? Some of them only appear in certain weather. .__.; Sorry about neglecting to mention that in the image but here’s the info:
The two statues on the east side of the map appear in all weather conditions.
The one on the west side of the Grave Ridge only appears in cloudy weather. It’s also hidden in a whirlwind.
Out of the two in the Clearwater Marshes, one of them appears only in stormy weather. I THINK it’s the farthest one.
Also, all of them need Moogle Hunt except the one closest to the Nomad Camp.
Why isn’t Miss Horizon taking the Academia map for the Paradox Professor sidequest? It’s at 100%! Despite the fact that the map shows 100% for Academia 400 AF and 4XX AF, there’s actually one more year to explore. Progress the story a bit more to get to the final Academia era. .
What gates goes to/How do I get to [ location name ]?
The story/shiny gates shouldn’t be too much of a problem since you have to go through those ones so getting the corresponding artefacts generally come in some story-related event or finishing Live Trigger conversations with key individuals. It gets sort of tricky when you’re doing sidequests because you have no idea if the Crystal/Blue Gate that’s in front of Serah and Noel will bring you to the location you want. It doesn’t help that you’re also limited to about 8 Wild Artefacts prior to Episode 5. Lucky for you, I’ve compiled a mini guide that pinpoints blue gate locations AND their destinations~! Check it out here: https://koukoupuffs.wordpress.com/2012/02/09/ffxiii-2-crystal-gate-locations-destinations-minor-spoilers/ .
Still on the subject of the Wild Artefacts, you can technically get the 9th one from Serendipity but only if you’re up to doing some chocobo racing, playing the slot machines, or even grinding for gil to exchange for the required 10,000 Casino Coins to obtain it. (You’ll need 100,000 gil if you’re taking this route. Monsters with the Gilfinder II ability can speed things up a wee bit.) However, if you wait until after Episode 5, you will get a Fragment Skill that will bring the price down to 7,500 Casino Coins or something. BTW, the 10th Wild Artefact is also found in Episode 5. .
What are Time Reversals? How do I do a Time Reversal? What is the point?
To do a time reversal, you will need to find the respective Seals for each location. I think the main purpose of a reversal is to allow you to select other conversation choices as well as try different things like taking on Atlas without weakening it first in Bresha Ruins 005 AF. (This is a very bad decision if you haven’t been regularly beefing up your characters and monster ally. Actually, I’m not sure it can be defeated without using the device. ^^; I tried it a couple of game hours back but one punch from Atlas did the entire party in. Haven’t tried it again since.) .
There may also be instances where you actually need to reverse time to get to certain areas. For example, on the 51st floor of Augusta Tower 200 AF, if you left certain rooms facing a certain way after taking off to the Historia Crux, it may not be possible to rotate them back without the control panels on the inner-most walkway which, if I remember correctly, disappear once you get the key for the 52nd floor. So if you performed a time reversal here, you can redo the tower again and have access to the panels. .
Oh, time reversal may also be needed if you’re going for any trophies that require 5-starring certain boss fights.
You can ONLY complete either map once you progress the story; that is, it’s not possible to achieve 100% when you first arrive at those places.
Like the other ages of the Bresha Ruins, you will get access to different eras of Oerba and Academia throughout the timeline. Both areas have eras that are integral to the main storyline so there’s no way you can miss out on completing the maps. I got 100% on both in Episode 4 but I think — not entirely certain due to my crappy memory — it might be possible to finish all eras of Oerba in Episode 3; it just depends on whether or not you have enough Wild Artefacts and patience to go through all the Temporal Rift puzzles. XD
Edit on February 10th: Additional info about the Academia map — the 100% WILL NOT count against the Paradox Professor sidequest until you fully explore the map in the 500 AF era. 9_9
I’m currently in the last era of Oerba and I have 7 more puzzles to suffer through. I really don’t know who at Square Enix thought it was a good idea to include all the damnable clock puzzles. I’ve taken to solving them on paper first since, given the fact that a lot of them are randomized (not sure if they are ALL random as some of them don’t have timers), I can’t afford to make mistakes. So yeah, if you’re looking for solutions for the puzzles on YouTube or something, keep in mind that whatever the player has in his or her video is most likely not the same as yours.
Actually, the connect-the-crystal ones are becoming a pain as well as there are several of them that have gaps between tiles. =__= I usually lose time in the beginning because I have to move the camera around to spot the ones with the identical colours. What I’ve started doing is just selecting the closest crystal and dragging the line to one of the ones that have a matching colour. That way, the damn crystals won’t change places on me before I get there.
Ah, back to the clock puzzles! The logic behind them is simple. The problem is figuring out the starting number. I find that it’s easier to weed out the number to being with in the puzzles that contain 9 or more numbers because there will usually be an odd one out; that is, a number that either no other numbers can reach or only one other number can.
Solving clock puzzles on paper :3
Don’t mind my ugly scribbles. I don’t have the best handwriting in the world. XD Anyway, an explanation of all the numbers in pencil: The outer numbers indicate where the numbers will land. The first x = x is counter-clockwise movement. The second x = x is clockwise. Actually, now that I look at it again, it’s done in a way that only makes sense to me. XD Regardless, jotting down where each number ended up is what I wrote down. 😛 Interior numbers represent the order the numbers should touched.
Again, these are puzzles *I* encountered. There’s a very good chance you will never see any of the layouts shown above.
Many times, it takes me a few tries to figure one out … which is why I have the order written in pencil. I got a handy eraser right next to me in case I have to redo things. 😀 The only ones I never have to write down at the ones that have about six numbers and have 1, 2, and 3 as face numbers. The highest face number I’ve ever seen so far is 6.
I wonder if there’s anyone out there that can solve these fairly quickly?
Edit: Derp. The starting number in the second puzzle should have been 2 on the top right which leads to 5. >_>;
Currently on Chapter 4 looking for the Graviton Cores (see YouTube video here — not made by me — for all the locations ) but here are some random thoughts up to this point:
Some of the stupid answers can be fun to select just to hear the replies/reactions. ^O^ I love the one at the Bresha Ruins 5 AF when Serah’s pondering about something that shouldn’t exist in that time and place. I chose “Mog!?” as my answer when visiting again after a time reversal. Noel’s answer was “Your thought process shouldn’t exist.” ^O^;; .
I wonder if the game remembers what you chose or this only happens if you follow the “same train of thought” but in Augusta Tower 200 AF, when Noel and Serah wonder who was pulling the strings, one of the answers was “Someone unexpected!”. Turns out Serah was trying to say it was Mog again. ^O^ I love Noel’s reaction. ^-^; It’s just so horrible that you can make Serah so ditzy if you want. I’m not sure Noel’s answers are ever as ridiculous. For the record, I’m choosing all the logical choices first and only opt for the stupid ones after a re-visit via time reversal.However, I must say that the boss battle in Augusta 200 AF threw me for a loop. Took me 3 tries to get the correct answer since that one was kind of a strange option. ^^ .
I LOATHE Academia 400 AF. In fact, I just loathe the layout to Academia in general. It’s really terrible to navigate when you’re force to fight every battle. It’s a shame that girl that asks for the 100% maps doesn’t appear again in the alternate time. .___. But then, why would she if the hacking/paradox is resolved? Ergh. I still have to find the stupid blue gate in 400 AF. This will be fun … although I suppose I could just wait until the guidebook arrives so I can just use the map. Of course, that’s assuming the author marks the location and that it’s correct. 😛 .
I also hate the clock puzzle in Yaschas Massif 110 AF. I got up to Stage 3 and then got stuck trying to solve it. I wish the puzzles weren’t random. I wonder if these are the only random puzzles in the game? :V .
I got up x100 Victory Mode in the slot machines but the stupid thing wouldn’t give me a jackpot even when I was down to like 1900 coins. I think I got there from 3500 or so. >:/ Typically, when it comes to trading in coins and such for gifts, I tend to use the method of buying the currency with gil and then getting the stuff that way. The problem is 10 gil = 1 Casino Coin. I’m usually hovering around the 20,000 gil mark (since I spend money to buy greens and adornments and other silly things now and then). I need to find a way to get over 100,000 gil. Well, I did have 99 Tears of Remorse thanks to running around in Academia 400 AF but those things don’t sell for all that much. 😐 Why can’t the Cie’th there drop Perfumes? XD .
Chocolina needs to die. .
Mog Throw can be hilarious at times. I love watching him bounce all over the place or just hurl him into a chasm. XD .
Random screenshots. (Please don’t ask me for all the locations. I think there’s a YouTube video for it so check that instead. ^^) And the quality is kind of crap because I’m screencapping via S-Video and not HD. Oh, there’s not an actual chocobo at this particular spot; I rode one here. XD
Wild Artefact in Oerba 200 AFAcademia 400 AF -- Gate to Yaschas Massif 100 AF. Required for Graviton Core Epsilon. A Wild Artefact is needed for this gate so make sure you have at least one available.
Edit: More screencaps! XD
Wild Artefact in Archylte Steppe ??? AF - Located near the edge of the western part of the map. I got there by using the yellow cactuar statue (found in a tornado during windy/cloudy weather)Graviton Core Epsilon - Yaschas Massif 100 AF. You can access to this era via a blue/crystal gate in New Town from Academia 400 AF which is on the west side of the map.Emerald Crystal - Yaschas Massif 01XF. One of the 3 crystals needed for the guy looking for the 3 fallen stars. Get them all to collect the Mirror of Atropos fragment.Outdoor Watch - Yaschas Massif 110 F. Retrieve this for Shannon from Yaschas Massif 10 AF for the Innocence's Sacred Sphere fragment.Fragments so far. Totally NOT going for all 160. I did manage to get all 10 Crimson Memories ones though. Had to suffer immensely through stage 3 of the clock puzzles for them. Ugh. Yeah, the third stage was always the one that gave me problems.
I’m at the end of the Bodhum area (chapter 1?) and 2 things kind of tick me off about the game so far:
The dialogue choices can be ridiculous. What sane person thinks up the questions that Serah does? I believe this is a result of stupid writing. At least they’re not as demented as the black and white choices from inFAMOUS. Thank God the sequel was much better for those. 😛
The side mission/quest involving the medical kit. (Check YouTube for a walkthrough vid or IGN’s walkthrough/wiki guidefor a screen of its location). Why the fuck would you let the player obtain a quest where the item is not available until later? I know there are some games that do this as well but those typically tell you the vicinity of the item and by the time you get there/have access to it, you will find it.NOT SO WITH THE MEDICAL KIT.IIRC, you already passed the area when you went to the crash site the first time.However, the damnable medkit won’t appear until a bit later. 9_9
I suspect this won’t be the last time I will encounter this idiocy.
")

 - NPCs give you hints")