This post was originally published on August 9th, 2015 but there has been some new discoveries made since regarding raking in high scores and lots of Skillseeds. I’ve updated the post to reflect that information. :3
What’s New?
September 4, 2016
- Pretty much the entire guide’s been updated with new info. I’ve also added new screenshots after the videos to show what happens when you use a job with an Ultimate that has low attack power as well as what I consider a near perfect snapshot before an Ultimate is used.
August 5, 2016
- Switched out the second gameplay video to a more recent one showing a much bigger score. ^^
July 17, 2016
- Re-organized the guide; it’s still wordy but there are less paragraphs overall! The Red Mage Method section mentioned below has been removed.
November 8, 2015
- Added YuRiPa as a support card suggestion.
- Corrected small cactuar escape information.
- Removed the line about leaving the map to replenish the special attack gauge.
- Expanded the How to Fight section under The Red Mage Method.
- Added a video for the Red Mage Method.

Unlike the bonus region with the regular-sized cactuars (修練の霊殿), this one features enormous variants and a special x20 bonus multiplier for Skillseeds. However, some of the rules remain the same:
- It has a 30-minute timer and only areas marked with a cactuar icon has cactuars in it.
- Cactuar elemental affinity is not known beforehand.
- Time doesn’t stop if you leave the map but you don’t need to pay again with the 3 Mystic Tablets to re-enter within the time limit. Once the 30 minutes are up, the map resets — yes, even the chests! — and the entrance fee is required again. As of the May 2016 update, you can reset the map at anytime BEFORE the half an hour is up by using 3 Mystic Tablets.
The purpose of this map is to let players gain Skillseeds quickly. The trick to accomplish this is by using Ultimates (必殺技). Originally, this guide referred to it as The Red Mage Method as it was discovered by Hiru Sun from the Mobius FF English Facebook Group when he used that particular job. Have no fear though — you can achieve scores of 1,000,000+ easily with any job as long as it doesn’t have crazy high Attack and/or Break Power or an Ultimate with low Attack Power. The guide at the Japanese wiki site, Altema, lists the Warrior of Light (異説の騎士), Highwind (ハイウインド), SOLDIER 1st (ソルジャー1st a.k.a. the Cloud job), Samurai (侍), Boxer (拳闘士), and 仙術士 as ideal candidates to achieve the highest scores.
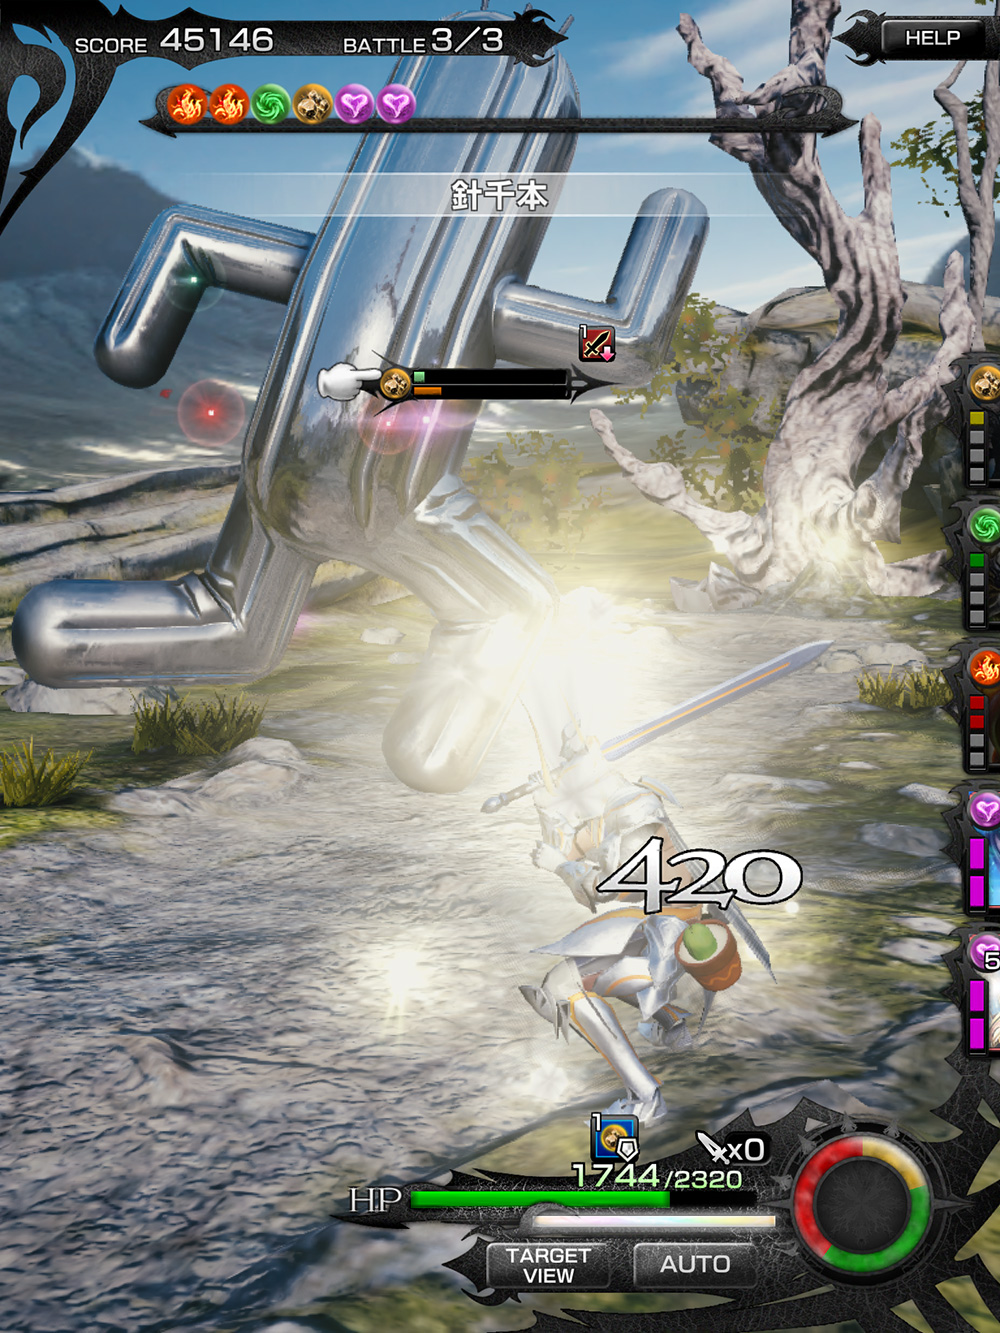
Battles against the jumbo cactuars are not recommended for low level decks or jobs with hardly any skill panels unlocked since they can and will hit you for 1,000 HP of damage in one blow. Yes, it’s the cactuar family’s trademark 1,000 Needles (針千本) attack. There are minor 200 and 500 Needles attacks as well, but this will only be a concern if you don’t have a means to replenish HP so consider putting one in your deck or using a Rental Card. If you’re playing on Hard difficulty, you may also be subject to the even more dreadful 2000 Needles (針二千本).
Three notes before we get into the meat of the guide:
- The Mobius Gift Box (メビウスギフトボックス) offers a Skillseed bonus of +50%. It’s not difficult to save up 1500 Magicite (魔石) to purchase it! I recommend getting it for the bonus along with all the other perks it offers.
- The following is written with the assumption that the player’s job is strong enough to complete all Gigantuar areas within the time limit. As the method involves reducing the Break bar slowly, there’s a possibilty that jobs not fully developed or ones with low Break Power will fail to defeat all monsters before the 30 minutes is up. If this is the case, you may consider simply putting enemies into Break instead when the Ultimate is ready.
- I choose to reduce the yellow Break bar over a red one but it’s possibly to work with a red Break bar as well. Just be wary of how fast it’s depleting because a portion of it needs to remain by the time the Ultimate is available for use.
Setting Up
- If you’ve unlocked the option to switch between jobs, you can outfit the MAIN deck with cards based on whatever Skillseeds you want to farm because your SUB deck will be what you use to attack. Put the buffs and/or debuffs into that one. (The game only counts the cards from the MAIN deck for multipliers.)Attack-type cards are not necessary but if you do bring one, it should not have high Attack Power. To be on the safe side, decide on a card that belongs to a different job class. This will make sure you can’t destroy the Break bar easily when using it on a monster that’s of the opposite element or one that’s neither strong or weak against it. A warning: for an enemy that’s of the same elemental affinity, the Break bar will not drop to red.
.
If switching jobs isn’t an option, you can still focus on placing cards geared toward the element you want to farm but since it’ll double as the attack deck as well, you’ll want to leave space for support cards. For Hard difficulty, the overall deck level doesn’t matter because every area on the map will always be at maximum risk level. One thing I do recommend is that the deck brings your hitpoints up to at least 3000. For Normal difficulty, keeping the deck level around 74 -104 and 2000+ HP is ideal.
.
Reducing a deck level is as easy as switching out a single card. Heck, you don’t even need a full deck! There’s a Reject option at the left corner of the screen where you’re selecting cards to use. Tap on it to remove a card from a deck. Of course, doing so will reduce the number of seeds you can get, but since the bonus multiplier will be huge, it doesn’t really matter that much, I don’t think. ^^; The reason for keeping the deck within a certain range is to have a base bonus multiplier of at least 1.5x.
.
Naturally, adjust your set up to your comfort level because there’s no sense of going out of your way to increase the difficulty of battles if you can’t survive them. If you only feel comfortable with tackling areas with a green-coloured risk level then do so. You’ll still enjoy a healthy Skillseed bonus in the end. 🙂
. - If they’re available, put in or rent Physical Attack boosting support cards like Gigant (ギガント), Garnet: Pictlogica (ガーネット:ピクトロジカ), or YuRiPa (ユ・リ・パ). Cards with the Snipe (スナイプ) or Berserk (バーサク) ability can be considered too as Snipe increases the chance of landing critical hits and Berserk increases attack at the expense of defense (but with the way the support cards will be used, lowered defense doesn’t matter).
.
Other card recommendations:- A Cure card of sorts since Gigantuars can be relentless with their kicks and magic on Hard difficulty.
- A debuff ability like Debarrier (デバリア) to reduce enemy defense so you’ll deal more damage. This translates to a bigger score.
.
Warning: DO NOT BRING HADES (ハーデス) OR ANY CARD THAT HAS DRAIN (ドレイン) AS AN ABILITY. It is guaranteed to be a waste of card space due to the fact that you will never do enough damage to justify its use. (There’s a possibility that you may restore decent amount of HP if you attack with regular attacks during Break but I’d still recommended against using Drain.). - Although not entirely necessary, the weapon of choice should be one with the たたかうで必殺技ゲージアップ auto ability. The ability enables basic weapon attacks to charge the Ultimate Skill gauge a little with each hit. Some jobs that have this are the Red Mage’s Mars Crosier (マーズジェズル), the Bard’s Orichalcum (オリハルコン), and Ace Striker’s Brotherhood (フラタニティ). Please note that I listed names of the job cards; the weapons actually become available on page 5 of the Skill Panel pages. The exception is Ace Striker as Brotherhood was obtained as a pre-registration gift or from drawing the job card. This particular weapon is unlocked on page 1.
. - For those looking to play on Hard difficulty: switch game difficulty to Hard from the Config menu. To do this, go ETC then Config (コンフィグ). There is only one bar on the page that reads either Easy or Hard. If it’s on Easy, drag it right so it shows Hard. Note that this affects every map except the Den of Chaos (カオスの魔窟), Pleiades Lagoon (プレアデス・ラグーン), and Battle Tower (バトルタワー) events.
. - Make sure the Ultimate gauge is full. If not, fight in any areas with no cactuar icon until the gauge is filled to maximum.
Tip about 1,000 Needles: The Wall (ウォール) ability from a card like Alexander (アレキサンダー) can reduce the damage. The wall itself will most likely vanish immediately after since I think the maximum damage it can take is 1,000. Unfortunately, because the damage is fixed, the Barrier (バリア) buff ability from the Fat Chocobo (デブチョコボ) or Gold Chocobo (金チョコボ) is rendered useless.
These are some old screenshots from when I first did this map. I played normally with basic attacks and card abilities which is the reason for the low score. I was still pretty excited though since I’ve never seen multiplier numbers so high. I was shocked to discover that they could go even higher. ^^


How to Fight
Play manually so you can control when to use Element Drives and abilities.
Here’s the cycle to follow:
- A battle begins, use regular attacks + Element Drives to fill up the Ultimate’s gauge. (If the gauge is already full, then work on reducing Break to happen.)
- Enemy’s Break bar is reduced to a minimum
- Switch to Sub deck (if applicable). Warning: If using the Sub deck for debuffs, ensure there are elements in the Element Stock Bar before switching jobs
- Use attack strengthening support card(s) and defensive debuff(s) (if applicable)
- Use Ultimate on enemy
You may want to throw a skill at the enemy but only when you know it’s not their weakness AND it doesn’t heal them. If you attack with a weakness, then the next hit or two may send them into Break and following that, another attack will kill them off. You don’t want to have that happen that if the gauge isn’t full yet. If you use something that heals them, your score will reduce.
The first battle can be tricky due to enemies wanting to flee; if a phrase with “消” in it or “そわそわしている” appears on the screen, the monster will run in the next turn. There’s also a good chance that you may not be equipped with their elemental weakness(es) but in the end, all that matters is defeating at least one with an Ultimate.
For me, the optimal battle situation will be the following:
- You have 2 or 3 enemies to pick off
- Your Ultimate gauge is full
- You have at least one of their weaknesses* which will make it easier to reduce the Break bar
- You have a support card with Brave (attack up) and Debarrier (lower enemy defense) and/or Unguard (bypass enemy defense).
*It’s best if the weakness is a support card and that it’s used after the Break bar is as low as you can get it.
In such an encounter, chip away at the Break bar to get it as small as possible. Use the debuff card(s) and/or an ability to change it red. Finally, use Brave and then slam them with the Ultimate. This will maximize the score. If the Ultimate gauge isn’t ready and/or no weaknesses can be exploited, then focus on defeating them like usual.
With the second battle, try not to take down the cactuar’s health too quickly since it may run. This shouldn’t be a problem if you’re using a job that has low Attack Power. (I’m guessing less than 500.) You may opt to heal during this stage if Wol’s HP drops below 3,000.
During the fight with the Gigantuar, it is vitally important to keep your health above 2000 HP since it can and will use 2000 Needles (針二千本). Its magic attacks can also do quite a bit of damage if your job doesn’t have high resistance against the element it throws at you.


The following two videos show the method above but with breaking the mobs instead because that’s how it was originally done to achieve x100+ multipliers.
This one blows the score from the previous video out of the water. 😀 I use debuffs in this which makes for a massive score. ^^ Check the video description for more details. 😀
When Everything is Near Perfect
I would have liked the Break bar to be even smaller and to have had a stronger Ultimate. (Granted, the Ultimate wasn’t maxed out yet when I did this. I’m not sure the difference would be immense though.) Still, achieving over 5 million is pretty good.


Potential Problems
Not Enough of the Necessary Elements
There’s every chance that I’m dumb when it comes to manipulating element orbs but what you see below can happen. This results in either one or no debuffs get used. If there are no life/health orbs, buffs would be left out as well. However, you can always throw the first battle in favour of getting a better score on the second one since it’ll be easier to set up when you have only one job to worry about.


Ultimate with Low Attack Power
The Strategist’s Ultimate is not meant for score.
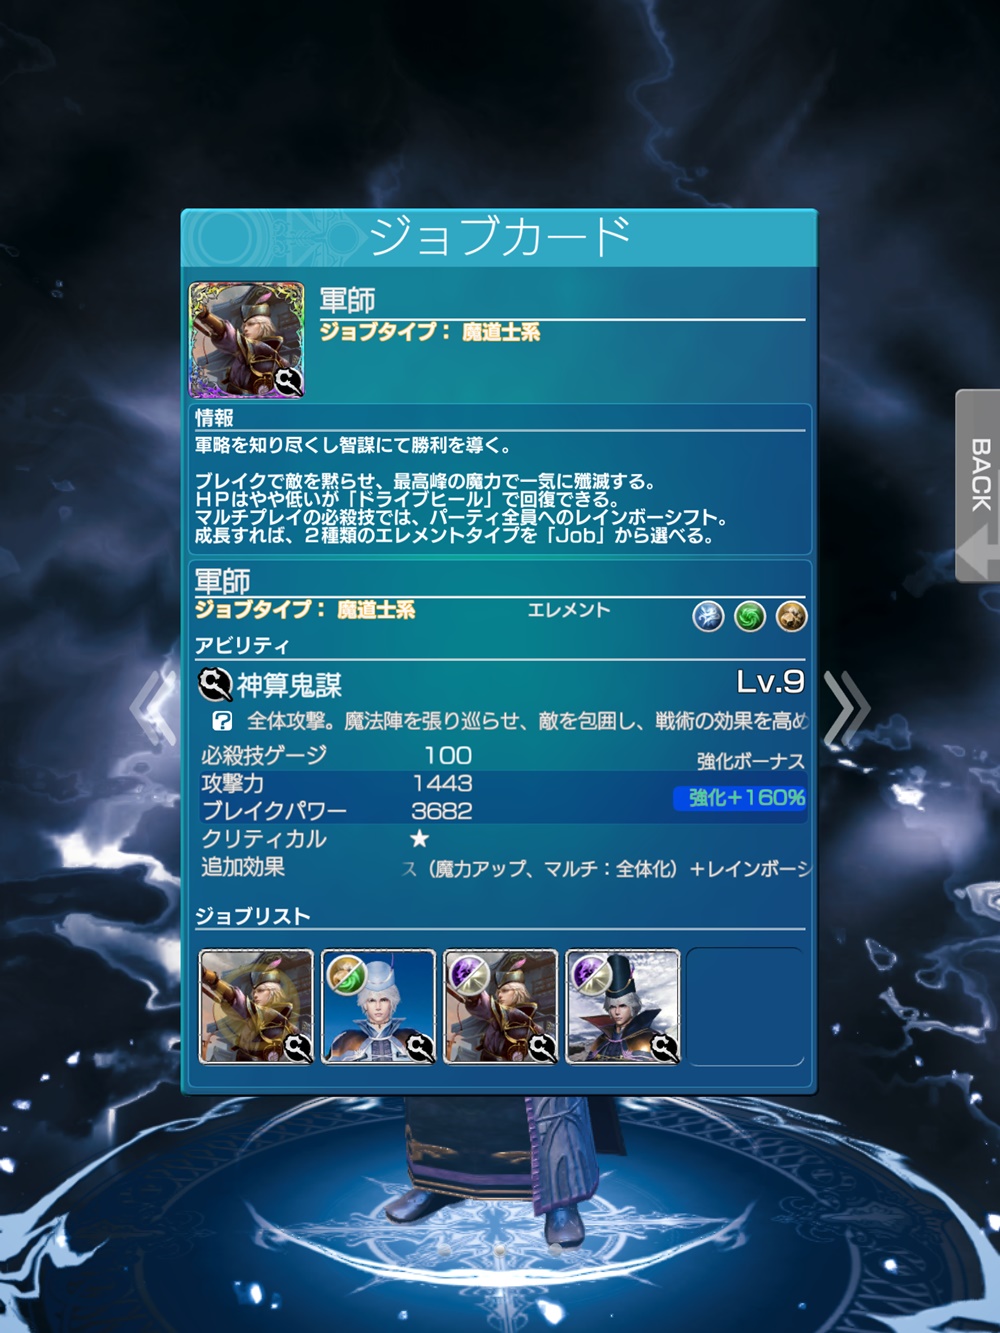
But I did this to test out how well it would perform on this map.

Here’s what happened once I got to the Gold Gigantuar:


Before the first use of the Ultimate, I only managed to get in Unguard. That knocked the Gold Gigantuar’s HP down by a quarter. -_- The score at that point was 656853.
I managed to toss on Critical Resistance Down and attacked with physical attacks until the Ultimate was ready again. When that happened, it used 2000 Needles which reduced its defense dramatically.
I took the chance to do this:

Since the Ultimate was ready again …

That score still manages to get a heck of a lot of Skillseeds so it’s not so bad. The problem is that this process takes up a lot of time with the Strategist.
What To Do With The Gigantuar Cards
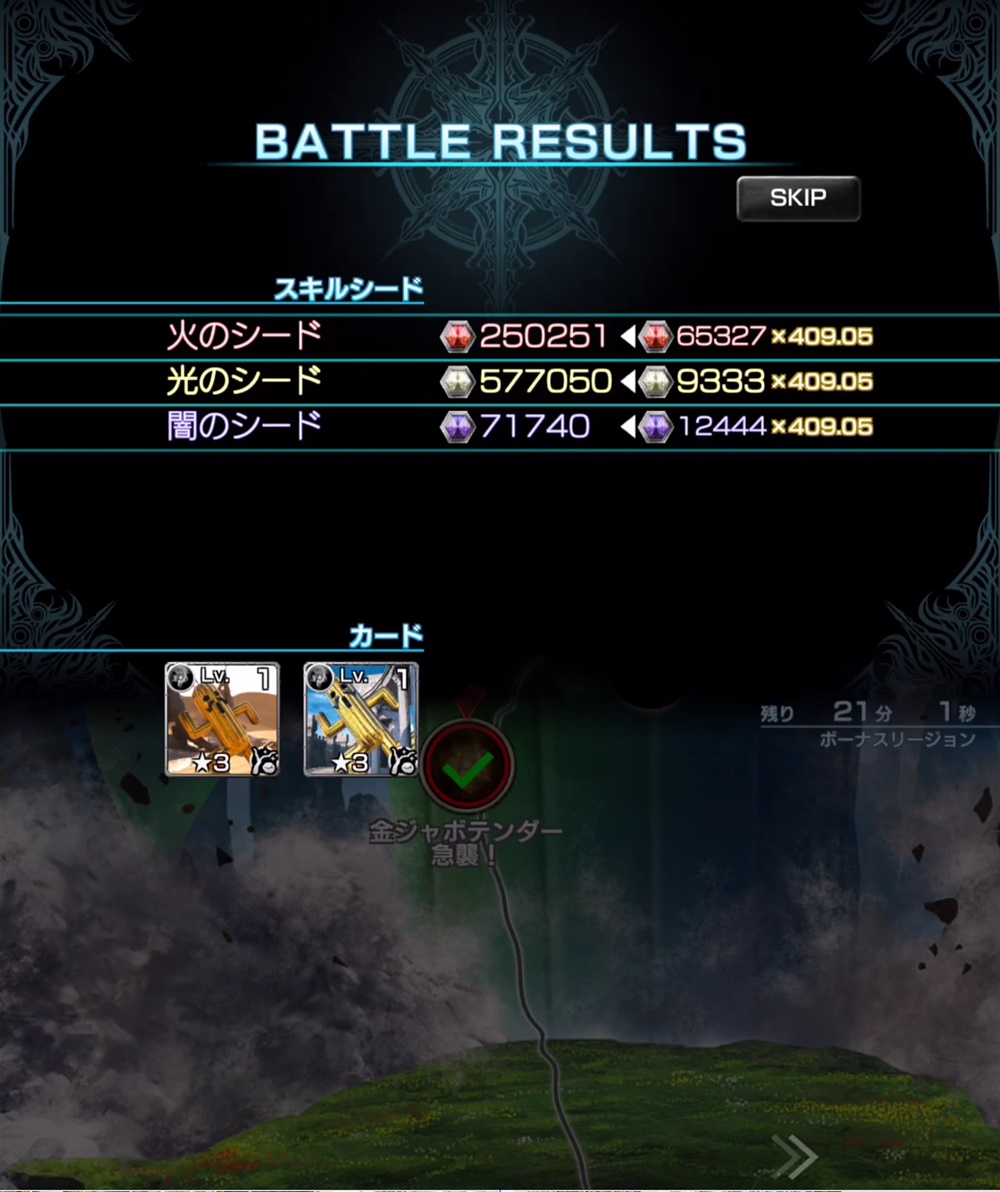
They’re all like their smaller counterparts except they provide more Gil, more experience when used in fusion, and their fusion success rates don’t suffer as much of a depreciation when used to level up Skillseeds.
For the Gold Gigantuar, the selling cost is as follows per rarity: ★2 = 10,000, ★3 = 40,000, and ★4 =150,000
Metal Gigantuars give the following amount of experience during card fusion: ★2 = 7,777, ★3 = 33,333, and ★4 = 111,111
Gigantuars (the green type) are for increasing the Skillseed level of a card. The percentage amount will vary depending on the card’s rarity and what level the Seeds are.
There’s also a little rare card that may come into your possession that’s known as a Gigantuar Bulb. (See lower right image above.) It’s a material for class changing 4-star ability cards to 5-star. The Bulb may also be used the same way as regular/green Gigantuars to develop a card’s Skillseed level. Along with being treasure drops from Gigantuars, the Bulb may be available in Item Shop (アイテムショップ) for purchase from time to time. It costs 400 Magic Stones.

3 thoughts on “Mobius Final Fantasy – Gigantuar Map (ジャボテン御苑) [Updated September 4, 2016]”